NOTICE: TopEx is no longer maintained and the website at topex.cctr.vcu.edu may be decommissioned in the near future.
TopEx User’s Manual
- TopEx Overview
- Installation
- Quick Start Guide
- Tutorials
- Usage Instructions
- Acknowledgements
- Citation
- References
Table of contents partially generated with markdown-toc
TopEx Overview
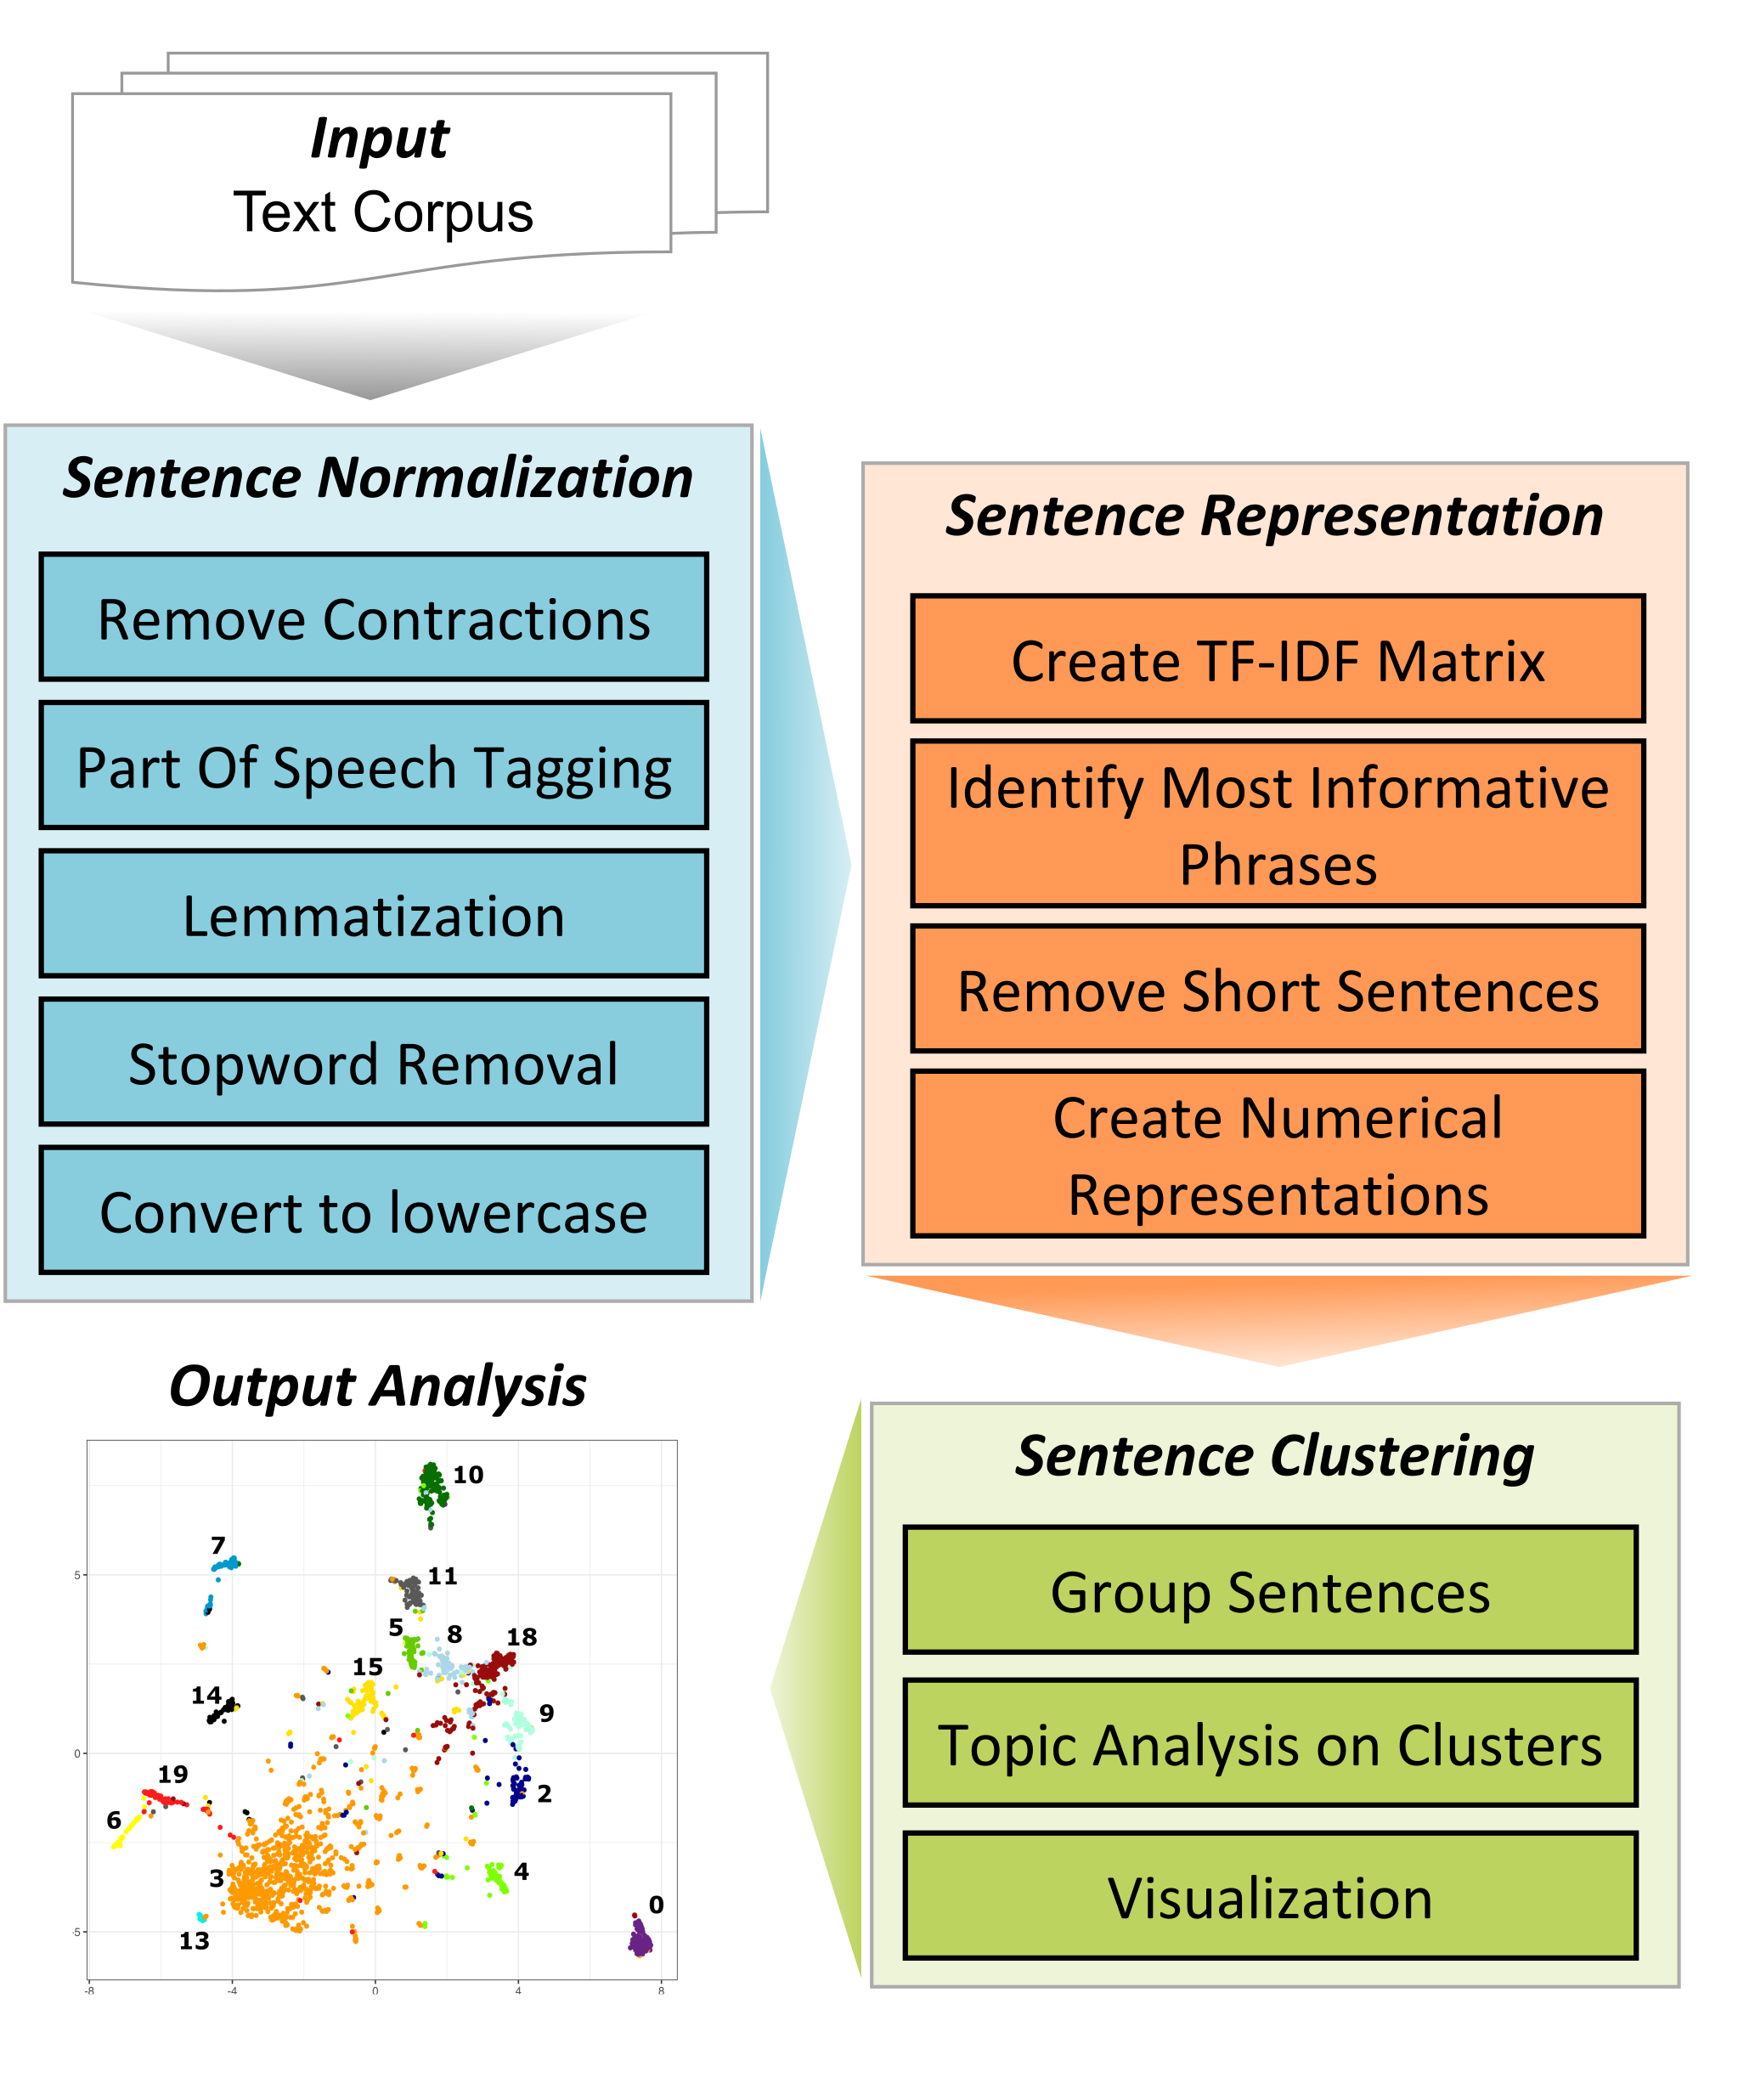
The TopExApp was built as a graphical user interface for the TopEx Python library (TopEx GitHub repository is here). This application allows users to explore the topics present in a set of documents without having to program or be an NLP expert. The algorithm and technical details behind TopEx are described in detail in (Olex et al 2020), and various use cases along with a high-level algorithm overview and the results of user evaluations for the BioCreative VII Challenge can be found in (Olex et al 2021). Figure 1 below illustrates the TopEx pipeline. TopEx operates by assuming each sentence in a document discusses a different topic. Each sentence is summarized as a key phrase, which is then represented numerically and clustered into groups. Sentences discussing similar topics should have numerically similar representations and be placed in the same group/cluster. A topic analysis is then run on each cluster to identify the key words associated with that group of sentences. Clustering results are visualized as a scatter plot where each dot represents one sentence, or as a word cloud to aid in identifying which word are the most frequent in a given group a sentences. Results can be downloaded either as a figure or as a delimited text file for further in-depth analyses of each cluster of sentences to identify common themes and topics in the analyzed corpus.
Installation
TopEx can be accessed on the web at topex.cctr.vcu.edu, which requires no installation. If analyzing documents with Protected Health Information (PHI) or other sensitive information you can install TopExApp and run it locally as a web app within a Docker container. To install TopExApp locally refer to the TopExApp Installation Instructions.
Quick Start Guide
The TopEx Quick Start Guide is meant to get users up and running with TopEx quickly using BASIC parameters. All other parameters are left at their default settings. It is recommended when changing other parameters the user should have a basic knowledge of NLP concepts and consult the detailed TopEx User’s Manual below.
Tutorials
This manual includes detailed descriptions of all TopEx options and parameters. If you would prefer a walk-through of how to use TopEx with some sample data, please complete one of the TopEx Tutorials or watch the TopEx Demo.
- Exploring COVID-19 Tweets: In this tutorial you will import a sample of Tweets from 2020 that are discussing the COVID-19 pandemic and will compare the topics discussed in March versus December.
- More tutorials TBD…
Usage Instructions
It is highly recommended that new users start by following one of the TopEx Tutorials or watch the TopEx Demo in order to get a general understanding of how TopEx operates. This manual goes into detail on each of the parameters and options to help users fine-tune them in order to obtain better or more relevant results. The most influential option is the selection of stopwords.
NLP projects generally have an iterative workflow as the best settings for various parameters are project-specific. TopEx is no exception. The most influential parameters for TopEx are the Sentence Embedding Parameters, including choice of stopwords, Expansion Corpus, and summary phrase length (i.e. Window Size parameter). Default parameters have been set based on the best parameters for the initial use-case described in (Olex et al 2020); however, these may not work well with new data sets that have different properties. This tool is for exploration of a corpus (i.e. set of texts), thus users should expect to run and re-run a few times before optimal results are obtained.
The general workflow for TopEx is as follows:
- Clean and Format Input Corpus
- Import document corpus or previous analysis
- Set algorithm and visualization parameters
- Run analysis
- Explore results
- Tweak parameters and run again
0) Clean and Format Input Corpus
The “input corpus” is the set of text documents you want to analyze. TopEx accepts several types of input:
- Individual text files (.txt)
- Pipe-delimited text file (.tsv)
- Excel file (.xlsx)
- MEDLINE formatted file (.txt)
- PubMed search from within TopEx
Some files may require cleaning and pre-processing that is project specific. In general, you want to ensure there are no odd characters in the data, and remove text that could skew your results. For example, in the Acting Intern corpus from (Olex et al 2020), many of the students copied the prompt question into their reply. This extra information was not needed and would interfere with the analysis; thus, all of these repetitive statements were removed prior to analysis. If it is not clear what type of, if any, preprocessing is needed for your corpus, you can input it as is and use the results to identify repetative or unhelpful statements to remove prior to a final analysis.
NOTE: When selecting files, TopEx will always display the file name(s) below the button that was pressed (except for PubMed search option). Thus, if you don’t see your file name(s) listed after selection then TopEx did not import your file(s).
Text file input
If using text files, TopEx expects each document to be in its own plain text file with the extension “.txt”. All text files should be located in a single folder with no other files present. When selecting to upload documents, just choose the folder that contains your corpus.
IMPORTANT: Text files MUST be encoded using UTF-8 encoding. Python will incorrectly process files that use a different encoding. To ensure your files are UTF-8 encoded you can open the file, then click on “Save As..” and look at the selected encoding. If it is anything other than UTF-8 then all files need to be converted. On the command line (tested on a Mac) you can do this automatically to all text files in a folder with the following command:
> ls \| while read file; do iconv -f utf-16le -t utf-8 $file > $file-utf8.txt; done
Pipe-Delimited File
A pipe-delimited file is a text file where each column is delimited by the pipe “|” symbol and the file extention is “.tsv”. TopEx uses the pipe as a delimitor because it is rarely used in general writing versus the commonly used comma or tab characters, which are standard delimitors. Thus, for TopEx columns must be delimited by a “|” character (not tabs or commas). This type of file can be generated from a spreadsheet application, such as Excel, Numbers, or Google Sheets, by changing the default delimitor used when exporting the data. However, TopEx does support native Excel file import, which may be more straighforward. An example of a pipe-delimited file is below.
id|text
001|Complete document text here
002|Another document text here
Excel File
An Excel formatted file must contain 2 columns, with the first row containing the column titles, and have the extension of “.xlsx”. The document ID should be in the first column and the entire text of the document in a single cell in the second column. Note that all IDs must have some sort of text in the second column. If a document ID is present, but the text column is empty TopEx will throw an error. Additionally, the extension must be “.xlsx” as the older “.xls” extension will not be recognized.
MEDLINE File
The MEDLINE format is provided for those who want to explore topics in a set of PubMed search results. When you are in PubMed, select to save your search results in a MEDLINE format. This will save the publication information, including the abstract. Once uploaded to TopEx, the abstract will be automatically extracted and run through TopEx, and no pre-processing is required.
PubMed Search
TopEx also provides the ability to run a PubMed search directly from the application. If using this option you can enter your search terms in the box and then select how many results to analyze. It is suggested you use at least 100 as choosing fewer does not provid enough information for the sentence embedding process.
IMPORTANT: This feature is limited in its search capability, so it is recommended to run a search through the PubMed interface and then save the results in a MEDLINE formatted text file. If using this feature then note that the first N documents matching your search will be returned regardless of if they actually contain any abstract information. Those that do not contain abstract information will not be included in the TopEx analysis, so while you may have selected for 100 documents to be returned, TopEx may have clustered fewer than what was specified.
1: Importing Document Corpus or Previous Analysis File
Import Document Corpus
Clustering Corpus (Required)
In TopEx, you are required to submit a Clustering Corpus. This is the set of documents containing the sentences you want analyzed and clustered. To do this follow these steps:
- Select the “Load Data” tab in TopEx.
- Choose one of the 5 options for a Clustering Corpus: text files, pipe-delimited file, Excel file, MEDLINE file, or PubMed Search.
- If choosing the text file option, click the “Upload docs to cluster” button. Navigate to the directory with the corpus. Select the directory and the click “Upload” (it may appear greyed out, but this is ok as you can still select it).
- Otherwise, click the appropriate button then navigate to the pipe-delimited, Excel, or MEDLINE file of interest.
A Clustering Corpus is required, and must contain a minimum of 3 documents, however, a larger set is highly recommended. By default, the imported Clustering Corpus is automatically used as the Background Corpus as well. The Background Corpus is the set of documents used to create the TF-IDF matrix that contains the distribution of each word across a set of documents. This matrix is used in two ways by TopEx: 1) Identification of the most informative phrase for each sentence to be used for sentence representation. 2) Creation of word embeddings, which generate the final sentence embeddings (i.e. numerical sentence representations) for clustering. Thus, the source corpus of the TF-IDF is very important as it is the backdrop for TopEx.
A Note on the Background Corpus
This set of documents helps TopEx determine which words are the most important and informative. These will be words that appear frequently in a subset of documents, but not in all documents. For example, if you have a corpus of documents that are all about dogs, do not expect the term “dog” to appear as important. Instead, you will get clusters of sentences talking about characteristics or breeds of dogs. If your Background Corpus is instead a set of documents that discuss dogs in some and cats in other, the term “dog” will be more important; however, it is still not informative if you are interested in more fine-grained characteristics of dogs; thus, selection of the Background Corpus is important and task-dependent. In general, if your input corpus is large enough then it is fine to be used as the background by itself as you are generally trying to find distinguishing characteristics within this corpus, but this may not always be the case depending on the task at hand.
Expansion Corpus (Optional)
In TopEx you have the option of expanding the set of documents used to create the background TF-IDF matrix (Background Corpus), which we call the Expansion Corpus. Users are given a choice as to what documents create the TF-IDF matrix: 1) Use only the Clustering Corpus. 2) Use the Clustering Corpus plus additional documents (i.e. the Expansion Corpus). 3) Use a completely different corpus. TopEx was designed to explore niche corpora that may have different focal points or properties than general domain text collections like Wikipedia. For this usage, users will want to either use only the Clustering Corpus for the TF-IDF, or use the Clustering Corpus plus Expansion Corpus. If users want to compare their corpus to a larger more general domain, then they may wish to import a separate corpus for TF-IDF creation.
To include an Expansion Corpus in your analysis, make sure all of the documents are saved in a single directory as text files (currently expansion corpus import only supports individual text file imports). Then do the following:
- Select the “Load Data” tab in TopEx.
- Click the “Upload expansion docs” button.
- Navigate to the directory with the expansion corpus.
- Select the directory and the click “Upload”.
To control which set of documents are included in the TF-IDF matrix, use the Background Corpus drop down in the Cluster tab. By default, the Clustering corpus will be used if no Expansion Corpus is loaded, or, if an Expansion Corpus is loaded, the default is to use both for the background. If both corpora are used as background, the Expansion documents will be appended to the list of documents in the Clustering Corpus to create the Background Corpus for the TF-IDF matrix. Note that any documents uploaded as the Expansion Corpus are NOT clustered. They are only used for creating the TF-IDF matrix.
Finally, you have the option of using one corpus for clustering and a completely different corpus as the Background Corpus. To do this, follow the directions for uploading the Clustering and Expansion Corpora above, then select “expansion” in the Background Corpus dropdown in the Cluster tab. This will ensure only the Expansion Corpus is used as the background.
Import Previous Analysis
Analyses can be saved into a TopEx formatted file, which can then be reloaded into the TopEx interface for further exploration. If you need to import an analysis file do the following:
- Make sure you do not have any files loaded in the File Manager tab! If you do, then hit your browser’s reload button to clear all loaded data.
- Select the “Import/Export” tab in TopEx.
- Click on “Upload file for import”.
- Navigate to the TopEx formatted file and click “Open”.
- Click “Import clustering(.topex)” button to load.
Note: At this time you may only perform re-clustering and image/data exporting on an imported .topex file. Running a new analysis using the Cluster tab is not currently avaliable. However, all options on the Re-Cluster tab can be used to explore different numbers of clusters on the current data set.
2: Setting Analysis and Visualization Parameters
TopEx has a variety of parameters that can be set to customize your analysis. There are parameters associated with how sentences are represented, how clustering is performed, and how the scatter plot is visualized. To change the default parameters go to the “Parameters” tab in TopEx. The list below explains what each parameter’s function is.
Basic Parameters
Number of Clusters
When only using the basic parameters, the default clustering method is K-Means. Adjusting the number of clusters, k, will divide your sentences into exactly k clusters. See the Advanced Parameter Threshold description if you change the clustering method to HAC. Also see the Re-Cluster tab options below to adjust this parameter without having to re-process the entire data set (recommended for large data sets).
Stopwords
Stopwords are essentially a list of uninformative words that you want the algorithm to ignore. This list includes domain-agnostic words like “the”, “and”, “or”, as well as domain-specific words such as “COVID-19” or “patient”. In TopEx you have three options related to the utilization of stopwords:
- Use the default stopword list that contains domain-agnostic stopword (default behavior).
- Add additional domain-specific stopwords (upload a stopwords text file).
- Only use domain-specific stopwords without the default stopword list (upload a stopwords text file and check the “Custom stopwords only?” box).
Stopword removal is one of the most influential parameters that should be explored when analyzing a new corpus. Stopwords are specified in a text file with one word per line. An example file for COVID tweets can be found here. Note that the COVID tweets stopwords include the word “COVID-19”, which one may think is important; however, we already know the tweets are about COVID-19 as they were selected that way, thus, we don’t need to cluster sentences with this term as we instead want the topics within the COVID-19 theme.
To obtain a list of domain-specific stopwords for your project we recommend running TopEx without any custom stopwords, see what the most influential terms are (those that are driving the clusters), then add those as stopwords and run TopEx again. This can repeat until you are satified with the topics you are seeing.
Include custom stopwords only? This option is located in the Advanced Parameter section and will prevent the domain-agnostic stopwords from being removed and will only use the list of custom stopwords. Users might want to choose this option if the list of default stopwords (TopEx uses SpaCy for stopword removal) contains some terms that are important to your study.
Upload Custom Stopwords: To upload a list of custom stopwords navigate to your file and select upload. Your file name should appear below the upload button.
Sentence Embedding Parameters (Advanced)
These parameters control how a sentence is embeded into a numerical vector, and are divided into Basic and Advanced parameters. The TF-IDF matrix is created using all documents in the Background Corpus (see the Import Document Corpus section for details). This TF-IDF is used to reduce sentences to their most informative phrase (see Olex et al 2020 for details).
Biomedical Named Entity Recognition (NER)
TopEx has the ability to utilize the individual words, or to first convert each sentence to Biomedical Named Entities, prior to building numerical representations of sentences for clustering. For example, without biomedical NER the words “gene” and “expression” in the phrase “gene expression” would be processed individually; however, with Biomedical NER turned on, the concept of gene expression would not be split up and would appear in the analysis as the full concept “gene expression”. To turn Biomedical NER on, just CHECK the box on the Parameters tab.
Window Size
Controls how many words are in the most informative phrase for each sentence. If a sentence is too short to contain a phrase of this length, then it is ignored and removed from analysis. Default value is 6, and was determined by dividing the average length of a sentence in the Acting Intern corpus from Olex et al 2020 by two. If you are processing shorter sentences or phrases, such as tweets, you should consider reducing this value to retain more of your sentences in the analysis.
Embedding Method
Dictates the method used to obtain word vectors for each of the words in the selected phrase for each sentence. Options are:
- tfidf: No compression performed. The raw TF-IDF matrix is used to get word vectors. Note: the “Dimensions” parameter is ignored.
- svd: Singular Value Decomposition of the TF-IDF matrix into the specific number of dimensions (see below). (Default)
- umap: Compression done by the UMAP algorithm into the specified number of dimensions (see below).
- pretrained: Option allows you to upload pre-trained word vectors, such as those from Word2Vec. Must also include a BIN file containing the embeddings. Extracts word embeddings to the specified dimensions (see below).
Dimensions
Determines the number of dimensions a word embedding will be for sentence representation and clustering. Default is 200 or one less than the total number of documents, whichever is smaller. This must be set no larger than the total number of documents! For example, if you uploaded 100 documents your dimensions cannot be greater than 99. Additionally, you must have at least 3 documents minimum.
Include sentiment?
The calculation to identify the most informative phrase of a sentence includes a weighting factor for words associated with positive or negative sentiment so that these words are more likely to end up in the chosen phrase to represent a sentence. By default, this sentiment weighting factor is included in the calculation. To disable this feature and ignore the sentiment of words, UNCHECK the box beside “Include sentiment?”. Including sentiment in the phrase calculation is task specific. In the use case discussed in (Olex et al 2020) words with sentiment were more likely to elucidate challenges faced by medical students during their intership; however, if exploring texts discussing medical symptoms or some other factual corpus, sentiment may not be as important, or even detrimental, to identifying the most informative phrase with which to represent a sentence.
Sentence Clustering Parameters (Advanced)
The sentence clustering parameters control how sentence embeddings are grouped together. By default, the K-means clustering algorithm is used, which requires Euclidean distance as the distance metric, to group sentences into clusters.
Clustering Method
Determines the method used for clustering sentences. Options are:
- kmeans: Requires a pre-specified number of clusters to create (see Threshold parameter). Also ignores Clustering Distance Metric parameter as Euclidean is required. (Default)
- hac: Hierarchical Agglomerative Clustering can be used with any of the Clustering Distance Metrics below, and it requires a height at which to cut the generated dendrogram to create distinct clusters (see Threshold parameter).
Clustering Distance Metric:
Specifies the method used for determining sentence similarity. Options include:
- euclidean: Uses Euclidean distance, which primarily considers similar magnitude of vector elements. Is required for K-Means clustering method. (Default)
- correlation: Calculates the absolute value of Pearson’s correlation coefficient, which primary looks at similar patterns of vector elements and ignores magnitude.
- cosine: Treats embeddings as vectors and calculates the angle between the two vectors. This metric is frequently used in NLP.
Threshold (see Number of Clusters in Basic Parameter section)
To adjust the threshold, edit the “Number of Clusters” option in the Basic Parameter’s section. The threshold is either 1) the number of clusters, k, for K-Means clustering (default), or 2) the height of the dendrogram to cut in HAC. Note that if using k-means you will get exactly k clusters; however, using HAC may take sone trial and error as the max height of the tree changes with each data set. Default is set to 20, which is reasonable for both methods, but it is recommended all users should play with this parameter to identify the optimal value for their corpus. See the Re-Cluster tab options below to adjust this parameter without having to re-process the entire data set (recommended for large data sets).
Visualization Parameters (Advanced)
These parameters control how the scatter plot is created for visualization of the clusters. The scatter plot data is a compression of the clustering distance matrix down to 2 dimensions. It is NOT a direct vizualization of the compressed/raw TF-IDF. Thus, the user may choose a different compression method for visualization. Through many trials, we have found that UMAP using a cosine distance metric generates good visualizations that generally correspond to sentence clusters found using SVD compression; thus, UMAP is the default; however, other options can be explored. Note, compression is always to 2 dimensions for 2-D scatter plot visualization.
Visualization Method
The method used to compress the distance matrix from the clustering step. Options are:
- umap: UMAP compression into 2 dimensions (Default)
- svd: Singular Value Decomposition compression into 2 dimensions
- tsne: t-SNE reduction into 2 dimensions, method used in some NLP circles
- mds: Multidimensional Scaling reduction into 2 dimensions, a non-linear dimension reduction algorithm
Visualization Distance Metric
Users have the option to re-calculate the distance matrix using a different distance metric than was used for clustering. Interestingly, using Euclidean for clustering and Cosine for visualization produces good visuals of the data.
- euclidean: Uses Euclidean distance, which primarily consideres similar magnitude of vector elements. Is required for K-Means clustering method.
- correlation: Calculates the absolute value of Pearson’s correlation coefficient, which primarily looks at similar patterns of vector elements and ignores magnitude.
- cosine: Treats embeddings as vectors and calculates the angle between the two vectors. This metric is frequently used in NLP. (Default)
UMAP Neighbors
If choosing UMAP for visualization, you have the option of selecting the number of neighbors UMAP uses for its dimension reduction algorithm. Default is set to 15, which is generally a good choice. Lower values will create larger more spread out clusters, and larger numbers will create more tightly packed clusters on the scatter plot.
3: Run Analysis
Once all of the parameters have been set you are ready to run your analysis. Navigate back to the top of the “Load Data” tab and hit “Run TopEx!”. If you decide you want to exclude some files from a particular run, you can uncheck them in the Load Data tab before running and they will be excluded.
4: Explore and Export Results
Results are shown in the center window as a scatter plot or word cloud. Results from the analysis can be exported from the Import/Export tab. To export the row-level results that include each sentence’s text, key phrase, cluster it was assigned to, and the cluster topic words click on the “Export row-level results (.tsv). A pipe “|” delimited text file that can be opened in Excel will be downloaded. From the Import/Export tab you can also export the scatter plot and wordcloud raw data as pipe delimited files to re-create it in other programs for customization.
Scatter Plot
In the scatter plot, each sentence that was clustered is represented by a dot. Clicking on the dots in the scatter plot will bring up sentence and cluster information in the right most panel, including the key topic words for each cluster. To save the figure as an image you can click on the “Export Scatterplot (.png)” button that appears underneath the plot. Additionally, you can download the raw data for the scatter plot from the Import/Export tab.
Word Cloud
The word cloud tab shows the frequency of the top words in each cluster of sentences. Larger words are more frequent. This allows one to get a quick view of the terms used most frequently in each cluster. If your mouse has a zoom feature or scroll bar, you can zoom in and out of the word cloud to explore it. To save the figure as an image you can click on the “Export Word Cloud (.png)” button that appears underneath the figure. Additionally, you can download the raw data for the wordclouds from the Import/Export tab.
Reclustering
Generally, finding the best number of clusters is a manual processes of trial and error. For large data sets that take some time to run through the full NLP pipeline it is not feasible to re-run the analysis with different clustering parameters. The “Re-Cluster” tab offers a quick way to look at different numbers of clusters without re-running the entire NLP pipeline. When using HAC, this tab will not re-calulate anything, it will simply move the threshold to identify a new set of clusters based on the current cluster information. For Kmeans clustering, the data will be re-clustered, but the NLP pipeline will not be re-run. Options for re-clustering are as follows:
- Height or K: If HAC clustering, then this is the height at which to cut the dendrogram to obtain discrete clusters. The height must be less than the max height of the dendrogram. An error message will be thrown if you choose a height that is too large. Currently, viewing the dendrogram is not avaliable in the TopExApp, but the TopEx Python package has this option. If using K-Means, then this is the number of clusters to group the data into.
- # of Topic Words Per Cluster: After clustering is done, the topic analysis of the sentences in each cluster are re-calculated. A single topic is returned for each cluster that contains N words describing the topic. This setting tells TopEx how many summary words you want to describe the cluster topic.
- Minimum Cluster Size: This setting is for visualization only. To clean up the scatter plot you can choose to have only clusters larger than a specific size shown in the graphic. The smaller clusters that are removed from the scatter plot are still present in the data export of the results.
Acknowledgements
TopExApp (previously MedTop) was initially developed as a web app through the 2019-2020 CapStone program by Seniors in VCU’s Computer Science Department under the supervision of Dr. Bridget McInnes and Amy Olex. We wish to thank Sean Kotrola, Aidan Myers, and Suzanne Prince for their excellent work in getting this application up and running! Here are links to the team’s CapStone Poster and Application Demonstration.
In addition, Evan French and Peter Burdette from VCU’s Wright Center for Clinical and Translational Research Informatics Core have been working tirelessly with Amy Olex to get TopEx ready for public release. Thanks to both of you for your amazing work!
Citation
If you use TopExApp in your research, please cite:
Olex A, DiazGranados D, McInnes BT, and Goldberg S. Local Topic Mining for Reflective Medical Writing. Full Length Paper. AMIA Jt Summits Transl Sci Proc 2020;2020:459–68. PMCID: PMC7233034
Olex, A.L., French, E., Burdette, P., Sagiraju, S., Neumann, T., Gal, T.S., McInnes, B.T., Kenneth, C., 2021. TopEx: Topic Exploration of COVID-19 Corpora - Results from the BioCreative VII Challenge Track 4, in: Proceedings of the BioCreative VII Challenge Evaluation Workshop. Presented at the BioCreative VII Workshop, Virtual, pp. 238–242.
References
Olex A, DiazGranados D, McInnes BT, and Goldberg S. Local Topic Mining for Reflective Medical Writing. Full Length Paper. AMIA Jt Summits Transl Sci Proc 2020;2020:459–68. PMCID: PMC7233034
Olex, A.L., French, E., Burdette, P., Sagiraju, S., Neumann, T., Gal, T.S., McInnes, B.T., Kenneth, C., 2021. TopEx: Topic Exploration of COVID-19 Corpora - Results from the BioCreative VII Challenge Track 4, in: Proceedings of the BioCreative VII Challenge Evaluation Workshop. Presented at the BioCreative VII Workshop, Virtual, pp. 238–242.